Installation
This instruction is for E-MouseLab installation on Windows operating system. Although both PC and Mac are good for client, we strongly suggest to use a PC as server for multi-user or multi-lab license.
For Mac users, please first install a virtual windows software and set up a virtual windows instance, and then follow the instruction below in that window.
Installation Step by Step:
For Single-user license and Demo version:
1. Unzip the setup package, run Setup.exe to install E-MouseLab into the default folder (C:\E-MouseLab).
2. Copy the database folder in the setup package to where you like to keep the database, for example D:\Database.
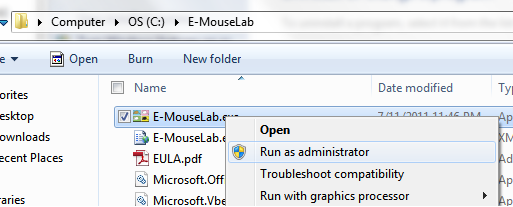
3. Make sure the computer is connected to a network, then run the program. For Windows Vista and 7 users, open the installed folder (C:\E-MouseLab by default), right click E-MouseLab.exe and select "Run as administrator" (only required for the first-time running).
If you used the MAC address of the Ethernet card when making purchase, make sure the computer is connected to a network by cable. Otherwise if you used the MAC address of the wireless adapter, make sure the computer is connected to a network by WIFI. The MAC address you used for purchase is in the user information which you can get from here or in the e-mail with the license code.
4. In the "Open Database File" window, enter the user name and license code, and click "Select Database File" button to select the file "MouseRoomDEMO.sdf" or "MouseRoom.sdf" you just copied from the package, for example D:\Database\MouseRoom.sdf. Click "OK" to open the database.
Now the program is ready to use!
For Multi-user or Multi-lab license:

The server PC holds the database and runs SQL Server 2008 Express for database operation service requested by the client PCs connecting to it. Please copy the database files to the server but not to each client PC. SQL Server 2008 Express is only required for the server but not for client PCs.
Please install the program under administrator account.
1. Unzip the setup package, run Setup.exe to install E-MouseLab into the default folder (C:\E-MouseLab).
2. Copy the database files in the setup package into a new folder, for example D:\Database.
3. Make sure the computer is connected to a network, then run the program. For Windows Vista or 7 users, open the installed folder (C:\E-MouseLab by default), right click E-MouseLab.exe and select "Run as administrator" (only required for the first-time running)
4. In "SQL Server Setup" window, select "This is server", or enter the server IP, then click "Next". If the program is running on client PC, the server setup steps will be skipped, please go to step 7. For server setup, see next.
5. The program will detect any SQL servers already installed on the computer. If there is up-to-date SQL server detected, click "Next". Otherwise, if no SQL Server installed, click "Install SQL Server", and then enter a password for the server. If the SQL server on the computer is in old version, click "Update SQL Server" to make update. It may take 15-30 min to install SQL Server.
Please write down the password ! It is required for database connection next.
6. After the SQL has been installed, click "Next". Select the folder you just copy the database files into (for example, D:\Database), and then click "Attach Database to Server".
7. When the database is attached to the server successfully, click "Next". The "Connect to Server" windows will be opened, enter license code and the SQL Sever password, click "Connect".
To allow the client PC to connect to Server, you need to add firewall exceptions on the server PC:
8. Add Firewall Exceptions
You need to add exceptions for the SQL Server and SQL Browser services, and open UDP137 port on the server if a firewall is running on it. If you are using Windows Firewall, do the following:
For Windows 7 or above:
- In your Control Panel, open the Windows Firewall applet.
- Select "Advanced settings" on the left panel, then in the new window select "Inbound Rules"
- click "New Rule...", in the new window, select "Program", then click "Next". Browse to select C:\Program Files\Microsoft SQL Server\MSSQL.10_50.SQLEXPRESS\MSSQL\Binn\sqlservr.exe (32 bit) or C:\Program Files (x86)\Microsoft SQL Server\MSSQL.10_50.SQLEXPRESS\MSSQL\Binn\sqlservr.exe (64 bit). Then click "Next" and select "Allow the connection", click Next twice, name it "SQLServer".

4. Add another rule, repeat 3, but select C:\Program Files\Microsoft SQL Server\90\Shared\sqlbrowser.exe (32 bit) or C:\Program Files (x86)\Microsoft SQL Server\90\Shared\sqlbrowser.exe (64 bit) instead. Name it "SQLBrowser".
5. Select "Port", then click "Next". Then select "UDP" and enter "137" as the port number. Click "Next" twice.
For Windows XP:
- In your Control Panel, open the Windows Firewall applet.
- Go to the Exceptions tab.
- Click Add Program
- Browse to and select "C:\Program Files\Microsoft SQL Server\MSSQL.10_50.SQLEXPRESS\MSSQL\Binn\sqlservr.exe"
- Click OK.
- Click Add Program
- Browse to and select "C:\Program Files\Microsoft SQL Server\90\Shared\sqlbrowser.exe"
- Click OK.
- Click Add Port on the Exceptions tab. Enter port number "137" and select "UDP"
- Click OK.